14 min to read
소셜 댓글 파일럿 프로젝트
스프링을 맛보다
1. 게시판
파일럿 프로젝트를 시작하면 A4용지가 한 장 주어집니다. 주어진 내용은 바로
필수 스펙 -Java8 -STS(intellij) -Spring 4.0 MVC -Spring Security -ORM(Hibernate 등) -Git -MySQL -Log4j -Springboot -Gradle -jQuery
선택 스펙 -Freemarker -Ajax -JUnit -Node.js -Backbone.js -BootStrap -빌드 시스템(grunt) -다양한 Spring Annotation -다양한 Design Pattern -다양한 opensource, framework
Spring framework를 처음 접해보는 저는 바로 멘붕에 빠져버렸습니다..

여러가지 선택 스펙이 있었지만, Freemarker가 궁금하여 찾아보았는데 servlet에서 제공하는 데이터들을 이용하여 HTML을 동적으로 생성하는 템플릿 엔진이었습니다. 하지만 Freemarker가 왜 선택 스펙에 있는가?? JSP는 이미 업데이트가 중단되었기 때문이었습니다.. 그래서 저는 과감하게 Freemarker를 선택하였고 선택 스펙에는 나와있지 않지만 front-end 라이브러리 관리를 위해 bower를 사용했습니다.
bower란.. A package manager for the web이라고 정의하고 있습니다. front-end 라이브러리인 jQuery나 BootStrap 등을 간편하게 관리하고 설치(결국 귀찮음을 줄이기 위해..)하기 위해 사용됩니다.
Spring framework를 써보면서 가장 헤맸던 것은 Spring Security, hibernate입니다.
로그인부터 세션관리까지 너에게 맡긴다. Spring Security
처음 Spring Security를 보고 뭘 보안해준다는 거지..라는 생각이 들었지만 Spring에서 제공해주는 엄청난 기능들이..!
Spring Security는 코드 몇 줄로 Enterprise급 웹 서비스도 빵빵한 보안을 지원해줍니다!
간단한 흐름을 보자면 "Authentication(인증) 후 각자의 role(user, admin 등..)에 맞게 Authorization(권한)을 받는다."입니다. custom한 Spring Security를 사용하려면 UserDetails와 UserDetailsService를 상속받아 입 맛에 맞게 바꾸어주면 되는 아주 간단하고 강력한 기능입니다.
지옥의 hibernate
ORM이란?? Object Relational Mapping 의 약자로
데이터베이스와 객체 지향 프로그래밍 언어 간의 호환되지 않는 데이터를 변환하는 프로그래밍 기법입니다. 대표적인 ORM 구현체인 hibernate의 간단한 예제를 보면
@Autowired SessionFactory sessionFactory;
public void saveUser(User user) {
    sessionFactory.getCurrentSession().saveOrUpdate(user);
}
query를 짜지 않고 더 직관적으로 DB에 접근을..!
Hibernate의 장점으로는
- 객체 지향적인 코드로 직관적이고 재사용 및 유지보수의 편리성이 증가한다.
- DB에 종속적이지 않다.
Hibernate의 핵심은 양방향 관계 맵핑이라고 할 수 있습니다.
실제 DB에 FK를 걸지 않아도 Annotation만으로 테이블의 관계를 설정할 수 있고 당장에 필요없는 데이터에 대해서는 FetchType(EAGER, LAZY)을 설정하여 필요할 때 지연로딩을 할 수 있게 해주는 꿀
기능을 지원합니다.
또한 여러가지 Annotation을 제공하는데
@SafeHtml은 필드에 Annotation을 붙이는 것 만으로 XSS 공격을 막을 수 있도록 태그를 변환해 줍니다.
이 외에도 @Length, @NotEmpty 등을 지정하여 값에 대한 validation을 해줍니다.
그리고 2주 후.. 대망의 코드 리뷰

- Exception 처리
- User의 PK를 integer로
- Javascript 코드 분리
- Require js (모듈화)
- Handlebars 등… 수많은 수정사항을 남기고 선임들은 떠나가셨습니다..
2. 소셜댓글
2차 파일럿 프로젝트 진행한 것은 바로 소셜댓글입니다!
사용한 기술 스펙으로는 -Springboot -OAuth 1.0 -OAuth 2.0 -Freemarker -Handlebars 등이 있습니다.
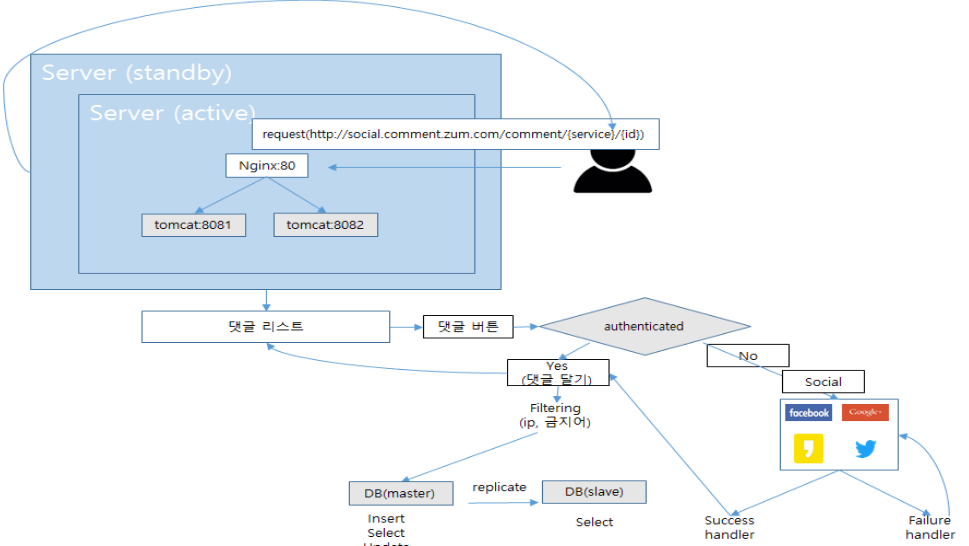
설계도
미흡한 실력으로나마 흐름만 설계를 해보았습니다. (민망)
내 맘대로 고르는 핵심
- Spring Social
- Spring Security oAuth
Spring Social에서는 단순한 방법으로 OAuth1과 OAuth2를 지원해줍니다. 참고로 facebook은 OAuth2이고 twitter는 OAuth1입니다.
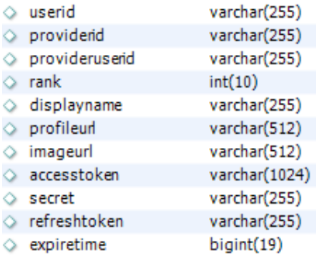
Spring에서 제공해주는 기능이라 믿을만하고 편하지만 Spring Social core에서 지원하는 OAuth를 사용하려면 아래의 DB 스키마를 무조건 따라야 합니다.(심지어 테이블명(UserConnection)과 PK(userid, providerid, provideruserid)까지 정해져 있습니다.)
소셜 댓글을 개발하면서 많은 삽질을 했습니다…
가장 먼저 시도했던 방법은 Spring Social을 이용한 인증 및 공유 방법입니다. 별도의 DB 스키마에 대한 제약은 없었지만 코드가 난잡해지는 효과가 있었습니다..
아래의 코드에서는 facebook을 통하여 로그인하였을 때 받는 권한을 명시하여 callback url로 권한 등의 정보가 포함된 access token과 바꿀 수 있는 code를 parameter로 받게 됩니다.
private OAuth2Operations oAuth2Operations;
private OAuth2Parameters oAuth2Parameters;
private final String fbCallbackUrl = "callback 받을 url";
private FacebookConnectionFactory facebookConnectionFactory;

@RequestMapping(value = "/fb")
public void facebook(HttpServletRequest req, HttpServletResponse res) throws IOException {
  logger.info("페이스북 연동");

  facebookConnectionFactory = (FacebookConnectionFactory) connectionFactoryLocator.getConnectionFactory(Facebook.class);
  oAuth2Operations = facebookConnectionFactory.getOAuthOperations();
  oAuth2Parameters = new OAuth2Parameters();
  oAuth2Parameters.setScope("email, public_profile, publish_actions");
  oAuth2Parameters.setRedirectUri(fbCallbackUrl);

  String authorizeUrl = oAuth2Operations.buildAuthorizeUrl(GrantType.AUTHORIZATION_CODE, oAuth2Parameters);
  res.sendRedirect(authorizeUrl);
}
code를 받았다면 이제 exchangeForAccess 함수를 이용해 실제로 사용할 수 있는 token으로 교환합니다. 그리고 token의 만료 기간을 확인 후 만료되었으면 갱신을, 만료되지 않았으면 token을 이용해 connection을 맺은 후 callback을 받기 이전의 함수에서 setScope로 지정해 주었던 권한 범위 안에서 해당 유저에 대해 facebook API를 이용할 수 있습니다.
@RequestMapping(value = "/fbcallback")
public String fbCallback(String code, HttpServletRequest req, HttpServletResponse res) {

  String accessToken = code;
  AccessGrant accessGrant = oAuth2Operations.exchangeForAccess(accessToken, fbCallbackUrl, null);

  logger.info("access token {}", accessToken);

  /**토큰 만료 기간 확인*/
  Long expiredTime = accessGrant.getExpireTime();
  if (expiredTime != null && expiredTime < System.currentTimeMillis()) {
      accessToken = accessGrant.getRefreshToken();
      logger.info("token refresh {}", accessToken);
  }

  Connection<Facebook> connection = facebookConnectionFactory.createConnection(accessGrant);
  Facebook facebook = connection != null ? connection.getApi() : new FacebookTemplate(accessToken);
  FacebookLink link = new FacebookLink("http://zum.com/#!/v=2&tab=home&p=3&cm=newsbox&news=0372016112834507815", "news", "테스트", "테스트 댓글입니다.");
  facebook.feedOperations().postLink("테스트..", link);
  return "redirect:/";
}
트위터의 경우 로그인에 한하여 OAuth2를 지원하기 때문에 글을 공유하기 위해서 OAuth1을 사용하였습니다. 트위터 역시 페이스북과 비슷한 흐름으로 흘러가지만 차이점은 OAuth 버전의 차이입니다!
두 번째로 시도했던 방법은 SocialConfigurer를 이용한 방법입니다. addConnectionFactories method를 override하여 app key와 app secret을 등록한 후 UsersConnectionRepository를 통해 DB에 사용자의 정보를 저장하여 사용합니다.
@Override
public void addConnectionFactories(ConnectionFactoryConfigurer connectionFactoryConfigurer, Environment environment) {
  connectionFactoryConfigurer.addConnectionFactory(
  new FacebookConnectionFactory(environment.getProperty("facebook.app-id"), environment.getProperty("facebook.app-secret")));

  connectionFactoryConfigurer.addConnectionFactory(
  new TwitterConnectionFactory(environment.getProperty("twitter.app-id"), environment.getProperty("twitter.app-secret")));
}

@Override
public UsersConnectionRepository getUsersConnectionRepository(ConnectionFactoryLocator connectionFactoryLocator) {
  JdbcUsersConnectionRepository repository = new JdbcUsersConnectionRepository(dataSource, connectionFactoryLocator, Encryptors.noOpText());
  repository.setConnectionSignUp(connection -> connection.getKey().getProviderUserId());
  return repository;
}
이 과정에서 field가 바뀌어서 facebook profile을 제대로 받아오지 못하는 문제가 발생했습니다.
 결국 PostConstruct와 reflection을 이용하여 field를 재정의해서 다음과 같이 문제를 해결했습니다.(휴)
@PostConstruct
private void init() {
  String[] fields = {"id", "about", "age_range",
                    "birthday", "context", "cover",
                    "currency", "devices", "education",
                    "email", "favorite_athletes", "favorite_teams",
                    "first_name", "gender", "hometown",
                    "inspirational_people", "installed", "install_type",
                    "is_verified", "languages", "last_name",
                    "link", "locale", "location",
                    "meeting_for", "middle_name", "name",
                    "name_format", "political", "quotes",
                    "payment_pricepoints", "relationship_status", "religion",
                    "security_settings", "significant_other", "sports",
                    "test_group", "timezone", "third_party_id",
                    "updated_time", "verified", "video_upload_limits", "viewer_can_send_gift", "website", "work"};
  try {
    Field field = Class.forName("org.springframework.social.facebook.api.UserOperations").
    getDeclaredField("PROFILE_FIELDS");
    field.setAccessible(true);

    Field modifiers = field.getClass().getDeclaredField("modifiers");
    modifiers.setAccessible(true);
    modifiers.setInt(field, field.getModifiers() & ~Modifier.FINAL);
    field.set(null, fields);
  } catch (Exception e) {
    logger.error(e.getMessage());
  }
}
하지만 여전히 코드가 너무 난잡해지는 효과가… 그래서! SNS마다 oAuth1과 oAuth2를 지원하는 것이 각각 다르기 때문에 oAuth를 통합해주는 기능을 찾다보니 Spring Social-core, connectController, ProviderSigninController, auth 등의 내용이 나와서 시도했지만, 불필요한 DB 정보들이 들어가므로 결국 제가 마지막에 선택한 방법은 Spring Security oAuth입니다!!
Spring Security oAuth를 사용하려면 간단한 설정이 필요합니다! (편의상 facebook 코드만 보겠습니다)
facebook :
  client :
    client-id:
    client-secret:
    access-token-uri: https://graph.facebook.com/oauth/access_token
    user-authorization-uri: https://www.facebook.com/dialog/oauth?display=popup
    token-name: oauth_token
    authentication-scheme: query
    client-authentication-scheme: form
    scope: publish_actions, public_profile, email
  resource:
    user-info-uri: https://graph.facebook.com/me
server:
  port:
이렇게 설정을 마친 후에 Security를 손봐줍니다!
@Override
protected void configure(HttpSecurity http) throws Exception {
  CharacterEncodingFilter filter = new CharacterEncodingFilter();
  http.authorizeRequests()
      .antMatchers("/comment/post", "/warning").authenticated()
      .antMatchers("/", "/login/**", "/logout", "/twitter/complete", "/comment/**", "/resources/**").permitAll()
      .anyRequest().permitAll()
      .and()
      .headers().frameOptions().disable()
      .and()
      .exceptionHandling()
      .authenticationEntryPoint(new LoginUrlAuthenticationEntryPoint("/"))
      .and()
      .logout().disable()
      .addFilterBefore(filter, CsrfFilter.class)
      .csrf().disable()
      .addFilterBefore(ssoFilter(), BasicAuthenticationFilter.class);
}

@Bean
public FilterRegistrationBean oauth2ClientFilterRegistration(OAuth2ClientContextFilter filter) {
  FilterRegistrationBean registration = new FilterRegistrationBean();
  registration.setFilter(filter);
  registration.setOrder(-100);
  return registration;
}

private Filter ssoFilter() {
  CompositeFilter filter = new CompositeFilter();
  List<Filter> filters = new ArrayList<>();
  filters.add(ssoFilter(facebook(), "/login/facebook", SocialType.FACEBOOK));
  filter.setFilters(filters);
  return filter;
}

private Filter ssoFilter(ClientResources client, String path, SocialType socialType) {
  OAuth2ClientAuthenticationProcessingFilter filter = new OAuth2ClientAuthenticationProcessingFilter(path);
  OAuth2RestTemplate template = new OAuth2RestTemplate(client.getClient(), oAuth2ClientContext);
  filter.setRestTemplate(template);
  filter.setTokenServices(new UserTokenService(client, socialType));
  filter.setAuthenticationSuccessHandler((request, response, authentication) -> response.sendRedirect("/facebook/complete"));
  filter.setAuthenticationFailureHandler((request, response, exception) -> response.sendRedirect("/"));
  return filter;
}

@Bean
@ConfigurationProperties("facebook")
public ClientResources facebook() {
    return new ClientResources();
}
Facebook에 대한 요청을 filter에 등록하면 로그인까지 Spring Security에서 관리해줍니다.(Security 너란 놈.. b) 로그인이 성공했을 때 callback url을 /facebook/complete으로 지정하였기 때문에 Authentication 대신 OAuth2Authentication을 parameter로 받으면 로그인 access token을 받을 수 있습니다! 또한, 별도로 access token을 저장하거나 관리하지 않기 떄문에 다른 방법보다 더 깔끔한 구조가 되었습니다!
@GetMapping(value = "/facebook/complete")
public String facebookComplete(HttpServletRequest request, HttpServletResponse response, Model model, OAuth2Authentication auth) {

  String userName;
  String userPrincipal;
  String socialValue;

  Map<String, String> map = (HashMap<String, String>) auth.getUserAuthentication().getDetails();

  userName = map.get("name");
  userPrincipal = map.get("id");

  String userImage = "http://graph.facebook.com/" + userPrincipal + "/picture?type=square";
  socialValue = auth.getAuthorities().toArray()[0].toString().split("_")[1];
  String userUrl = "https://facebook.com/"+userPrincipal;

  if (!userService.isUserExist(userName, userPrincipal, SocialType.valueOf(socialValue))) {
      userService.saveUser(userName, userPrincipal, SocialType.valueOf(socialValue), userImage, serUrl);
  }
  User user = userService.getUser(userName, userPrincipal, SocialType.valueOf(socialValue));
}
자 이제 로그인을 하였으니 작성한 댓글을 글과 함께 SNS에 공유하는 코드를 살펴보겠습니다!
로그인 한 사용자의 access token으로 권한을 받은 후 생성한 메시지와 함께 등록하면 끝!
@Autowired private OAuth2ClientContext context;

@PostMapping("/post")
public String postComment(HttpServletRequest request) {

  String message = request.getParameter("message");
  String isShare = request.getParameter("is_share");

  if (!authentication.getPrincipal().toString().equals("anonymousUser")) {
    ...
      commentService.createComment(message...)
      if (isShare != null && isShare.equals("on")) {
          String postLink = "http://hub.demo.zum.com/view.html";
          if (socialValue.equalsIgnoreCase("facebook")) {
              facebook = new FacebookTemplate(context.getAccessToken().getValue());
              FacebookLink link = new FacebookLink(postLink, "ZUM 허브줌", "라이프", "요즘 따라 정말 자주 보이는 그것, 해시태그 Haxhtag");
              facebook.feedOperations().postLink(message, link);
          }
      }
  }
}
결과는 바로!!

댓글이 등록됨과 함께 facebook 담벼락에 자신이 작성한 댓글과 글이 함께 공유됩니다!

느낀 점
ZUM에 입사하여 두 개의 파일럿 프로젝트를 진행하며 질문을 하지 않고 스스로 해결해 나아가는 것이 신입사원의 입장에서는 정말 힘든 일이었습니다.. 하지만 돌이켜보면 설계부터 개발까지 스스로 판단하고 문제를 해결해 나아가기에 개발자로써 성장하고 있다는 생각이 들었습니다. 무엇보다 스스로 하는 모든 일마다 “왜, 무엇때문에, 이게 최선인가”라고 끝없이 의심하고 더 확실한 방법을 혹은 더 좋은 방법을 찾아나가는 제 자신을 발견할 수 있었습니다.
파일럿 프로젝트는 스스로 발전할 수 있는 기회를 열어주는 선임들이 주시는 최고의 선물이었습니다!
이제는 ZUM의 ‘진짜’ 개발자로써 사람들에게 더 편리한 정보를 주고 더 좋은 서비스를 주기 위해 노력하는 개발자가 될 것입니다!
많이 부족한 글 읽어주셔서 감사합니다.

Comments