28 min to read
알람 서비스 - 파일럿 프로젝트
짧지만 강렬했던 파일럿 프로젝트 이야기
소개
안녕하세요. 해당 글은 제가 지난 4주간의 파일럿 프로젝트를 진행하면서 경험했던 것들에 대해 이야기하고자 합니다.
1. 파일럿 프로젝트 시작
줌인터넷에 들어오면, 실무에 바로 투입시키지 않고 파일럿 프로젝트라는 것을 진행합니다. 특정한 주제를 선정하고 이후에 주어진 기술스택과 기능스펙을 가지고 하나의 서비스를 만드는 것인데, 저 또한 파일럿 프로젝트를 진행하게 되었습니다.
저에게 주어진 주제와 기술스택 및 기능스펙은 아래와 같습니다.
2. 알림 시스템 만들기
알림 시스템을 듣자마자 머릿 속에 떠오르는건, 유튜브 알림이 떠올랐습니다. 평소 유튜브를 자주 보고 듣는데, 내가 구독한 채널의 채널장이 스트리밍을 한다거나 혹은 새롭게 영상을 업로드하면 구독하고 있는 구독자에게 알림이 오는 모습을 생각했습니다. 추가로 누군가가 나의 댓글에 답글을 작성한 경우에도 알림이 오는 것도 연상이 되었습니다.
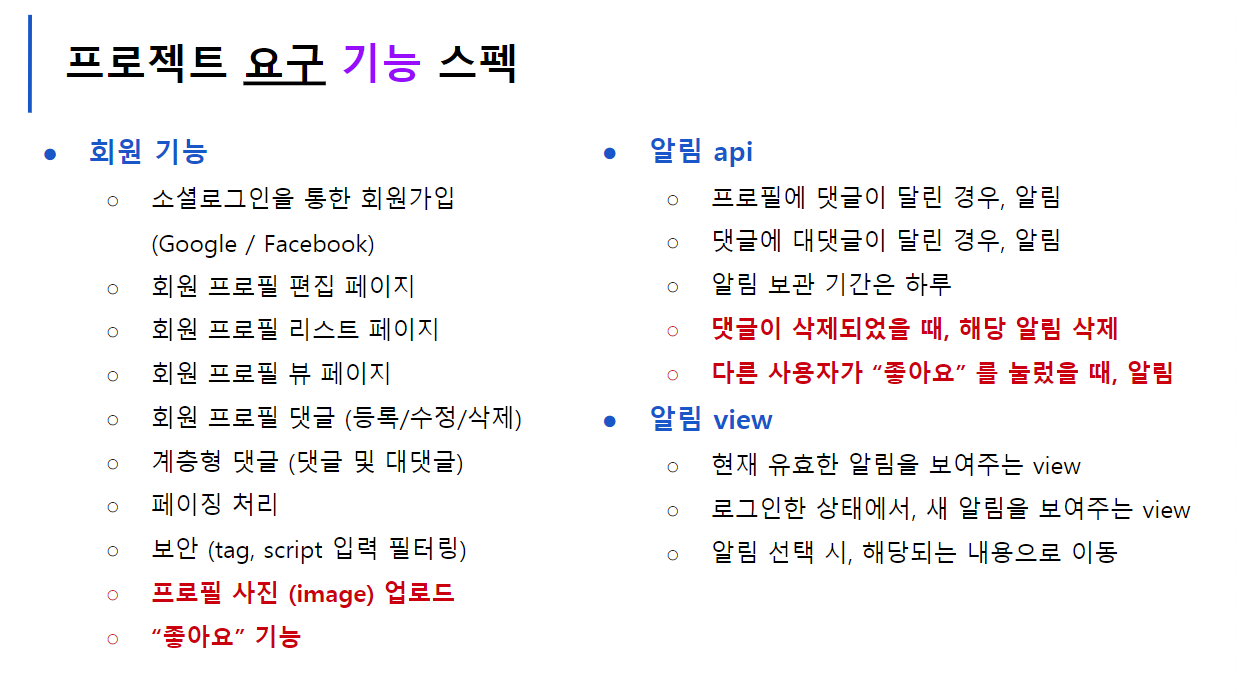
기술 스택

기능 스펙
파일럿 프로젝트와 기술 스택 및 기능 스펙에 대한 내용을 확인하면서, 들어는 봤고 제대로 해본 적이 없으니 이게 4주안에 내가 할 수 있을까라는 스스로 의구심이 들면서 이게 가능한 일인건가? 하는 불안함이 엄습했습니다. 팀 단위로 프로젝트를 진행해보기도 하고 나름 공부도 한다고 했지만 온전하게 스스로 무언가를 만들어 본 경험이 없어서 약간의 걱정이 앞섰습니다.
그리고 프로젝트 일정 중에 회사 내 플레이샵이라던지 신입사원 교육과 예비군 훈련 등이 있었습니다. 다행히 팀 내에서 그런 불가피한 일정들은 파일럿 프로젝트 기간에서 제외시켜 주었기 때문에 4주라는 기간보다 조금은 길게 프로젝트 일정을 가지고 갈 수 있었습니다.
추가로 파일럿 프로젝트를 진행함에 있어서 팀 내에 도움없이 스스로 문제를 해결하고 구현해야하다는 이야기가 있었습니다. 따라서 팀원 분들에게 프로젝트 관련 질문은 하지 않았습니다.
개발 일정 및 테이블 설계
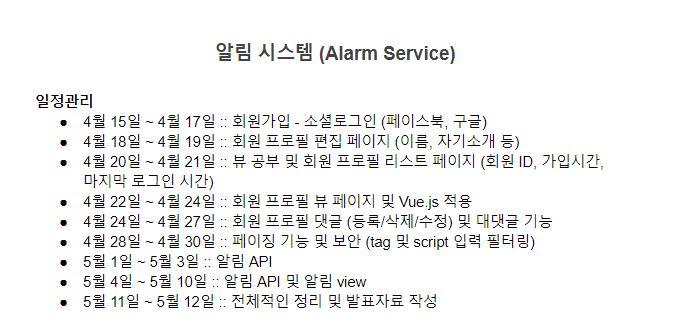
파일럿 프로젝트를 받자마자 개발일정은 구글 드라이브에 있는 구글독스로 간단하게 작성해보았습니다. 지금에서야 좀 더 상세하고 체계적으로 작성하는 것이 좋지 않았나 생각이 듭니다. 실제 파일럿 프로젝트를 진행함에 있어서 일정과 동일한 속도로 진행되지 않았습니다. 여러 예외적인 사항들이 많았고 새로운 것을 익히는 학습속도라던가 다양한 변수들에 대해서 고려없이 작성되었습니다.
최초 작성한 개발 일정
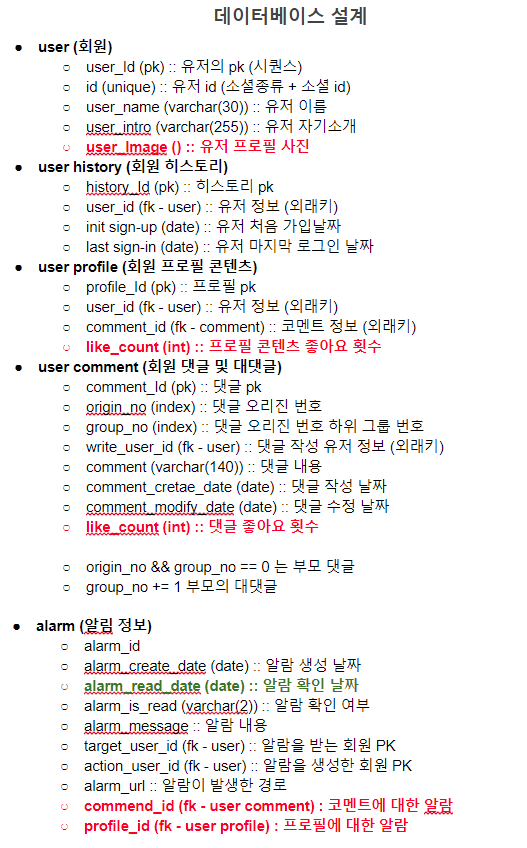
테이블 설계 또한 구글독스로 작성하였습니다. 테이블 설계에 대해 제대로된 경험이 없다보니 그냥 직관에 따라 주먹구구식으로 나아갔습니다. 돌이켜 생각해보면 좀 더 여유를 가지고 접근했으면 하는 아쉬움이 있습니다.
최초 작성한 테이블 설계 내용
3. 파일럿 프로젝트 진행 및 완료
시간은 파일럿 프로젝트 발표 날을 향해 열심히 달려가고 있었습니다. 그에 따라 아무것도 보이지 않는 제 서비스도 조금씩 모습을 조금씩 갖추고 있었던 것 같습니다. 발표날이 다가오면 다가올수록 과연 무사히 마무리할 수 있을까라는 생각도 했습니다.
3.1 서비스 전체 구성도
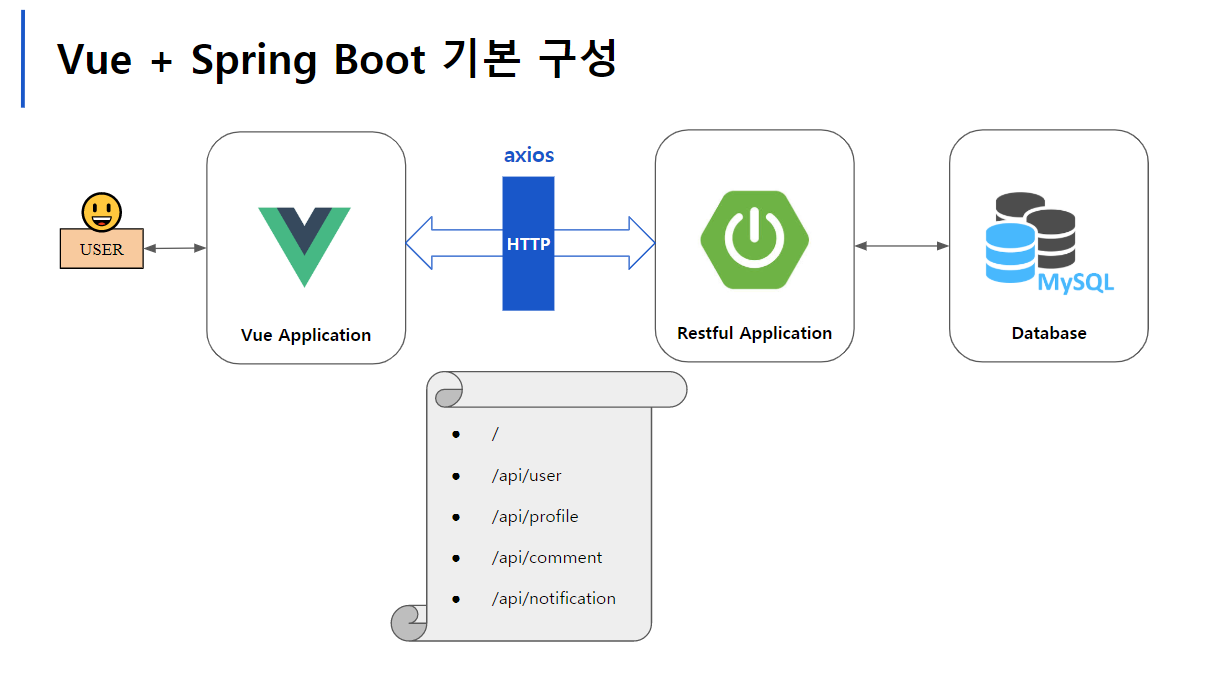
- 프론트엔드 Vue.jS & 백엔드 SpringBoot & 데이터베이스 MySQL
- 프론트엔드와 백엔드 사이의 통신 axios
3.2 데이터베이스 스키마
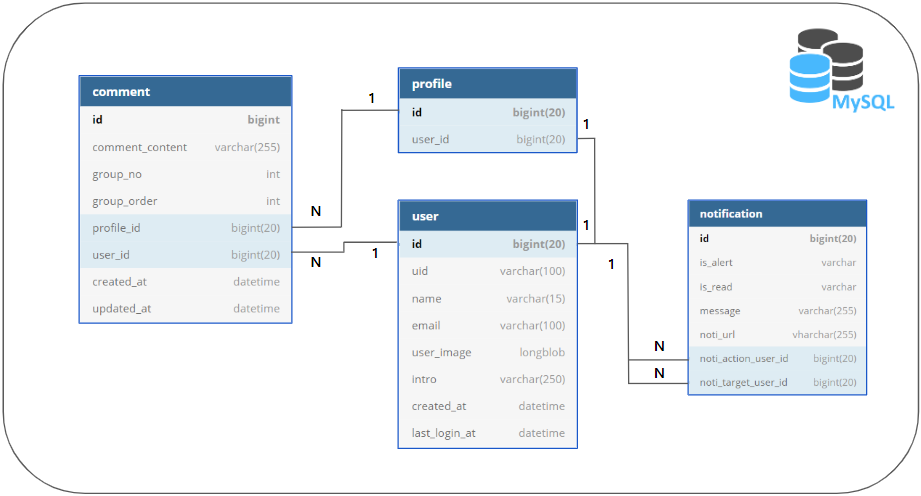
- 앞서서 구글독스를 통해 서비스의 테이블을 설계하였습니다.
- 이후 Spring Data JPA 가 제공해주는 레파지토리 인터페이스를 통해서 DB 에 접근하였습니다.
이 당시를 돌이켜 생각하면, 저는
- 객체와 테이블을 매핑시킨다는 개념으로 접근하는 것이 아닌, 객체를 테이블에 맞추어서 모델링 했습니다.
- 그래서 외래키 개념을 사실상 A 라는 객체가 B 라는 객체에 대한 레퍼런스를 가지고 연관관계를 맺는 것이 아닌, SQL 쿼리에 맞추는 형태로 가고 있었습니다. JPA 가 제공하는 API 가 매력적이고 객체와 데이터베이스간의 간극을 해결하기 위한 방법으로 나왔음에도 불구하고 그것들을 제대로 이해하지 못하고 적절히 활용하지 못한 것에 대한 아쉬움이 있습니다.
- 이후에 이러한 부분을 수정하였습니다. 그리고 JPA 다시 공부해야 함을 글을 작성하는 이 시점에도 느끼고 있습니다.
- 관련내용
3.3 Vue.js 와의 만남 (Feat.Vuetify)
- 기술스택에 프론트엔드 기술이 두가지가 있었습니다
- Freemarker
- Vue.js
- 저는 둘 다 처음 보는 기술들이었고, 어떤 것을 쓰는게 효율적인지 잘 몰랐습니다. 다만 프리마커같은 경우는 데이터를 바인딩하고 해당 데이터를 조작 및 재사용성이 어렵다는 내용을 보았고 반면에 뷰에서는 데이터 바인딩 및 재사용성이 상대적으로 높다라는 내용을 기반으로 뷰를 사용하게 되었습니다. 실제로 데이터를 바인딩히고 조작하는데 있어서 vue 가 주는 편리함을 느낄 수 있었습니다.
- 추가적으로 서비스의 UI 를 좀 더 아름답게 꾸며주기 위해 vuetify 라는 vue 와 연관된 UI 프레임워크를 사용하였습니다.
- vue 는 처음 사용하는 프레임워크지만, 영어로 되어있는 레퍼런스도 친절하였고 한글 번역도 충분히 이해하기 쉽도록 되어있어서 좋았습니다. 추가적으로 많은 분들이 관련 내용들을 본인의 개발 블로그에 예제코드와 더불어 친절히 작성해주신 덕분에 큰 무리 없이 진입할 수 있었습니다.
- 관련내용
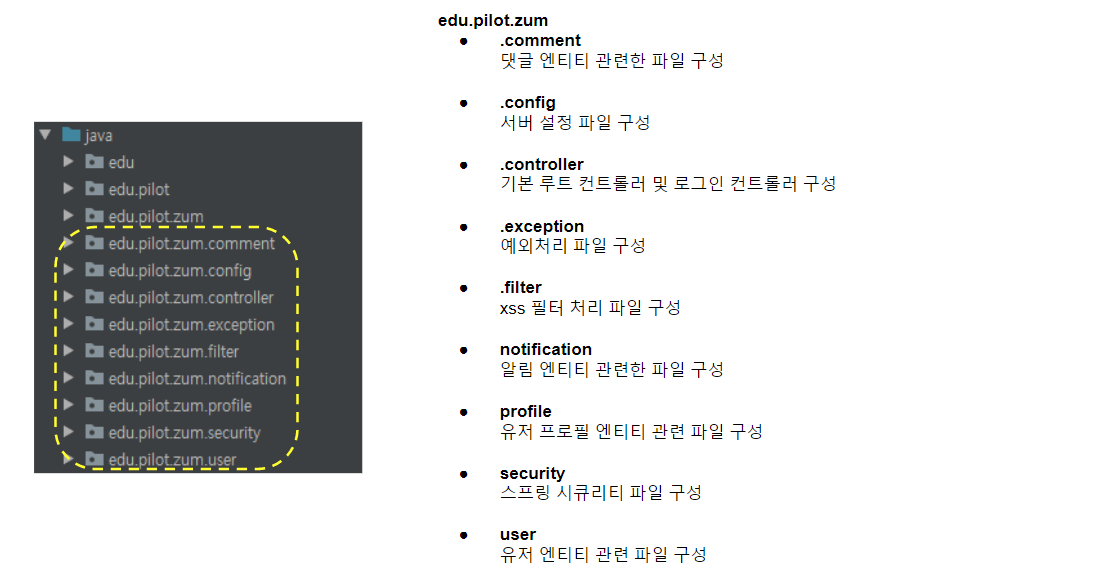
프론트엔드 전체 구조
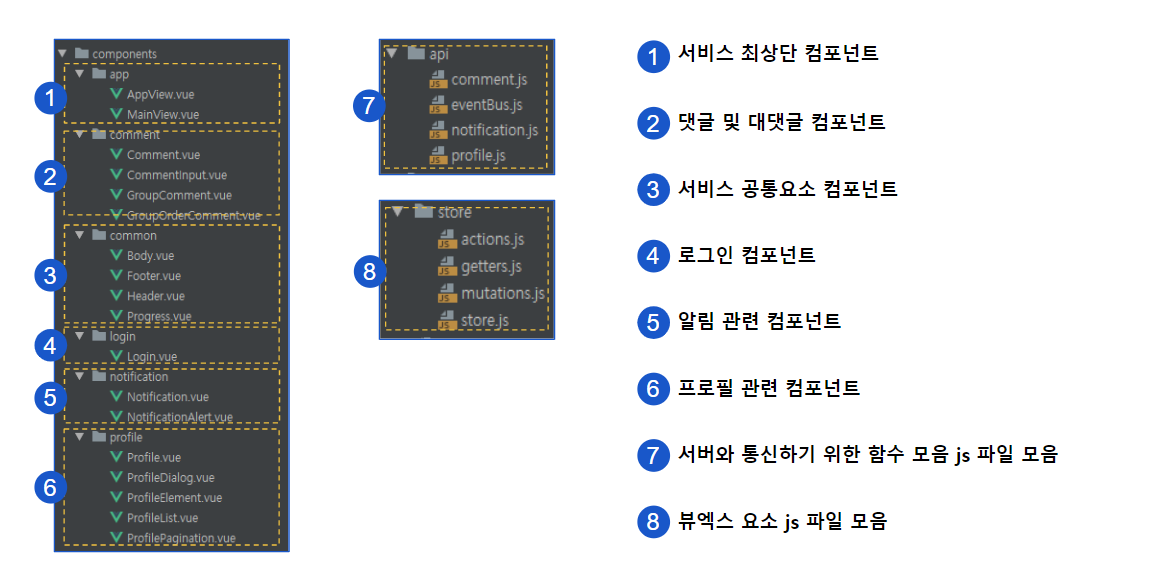
- 컴포넌트들은 해당 번호에 맞게 작성되었습니다.
- 공통적으로 쓰이는 것 컴포넌트들은 common 디렉토리에 위치시켰습니다.
- 그 외의 컴포넌드와 js 파일들은 연관된 것들끼리 묶어놓았습니다.
프론트엔드 컴포넌트 구조
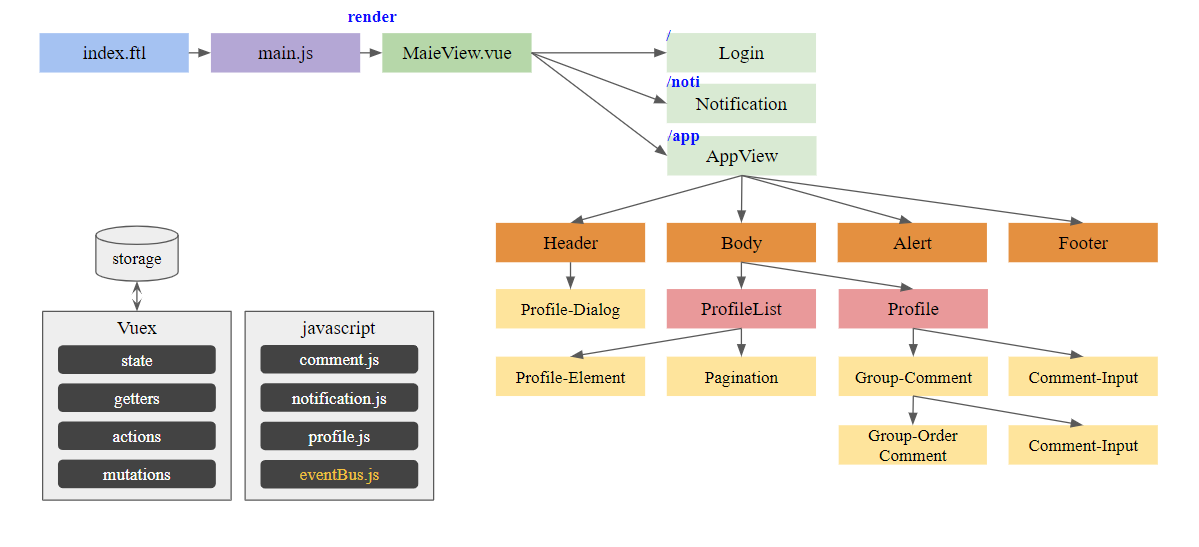
- 컴포넌트를 통해 HTML 요소를 확장하고 재사용을 할 수 있습니다.
- 상위 컴포넌트와 하위 컴포넌트를 두었고, 중첩된 컴포넌트로 두었습니다.
- 뷰 라우팅을 통해 특정한 경로에 특정 컴포넌트를 매핑하고 이후에 사용자가 해당 경로로 접근하면 어떤 컴포넌트를 렌더링할 지 정의해두었습니다.
- 추가로 특정 경로 내에서 보여지는 컴포넌트는 중첩된 컴포넌트로 이루어져있기 때문에 중첩 라우트를 사용하였습니다.
컴포넌트에 따른 화면 구성 일부
- 하나의 페이지에 여러 개의 컴포넌트가 존재하고 있는 것을 확인할 수 있습니다.
- 자식 컴포넌트도 보이고 형제 컴포넌트도 볼 수 있습니다.
- 이 정도 규모의 컴포넌트를 가진 서비스가 있다면 어떻게 데이터들을 전달받고 전달하는 것이 좋은지 생각해볼 수 있었습니다.
이벤트버스(EventBus) 의 이용
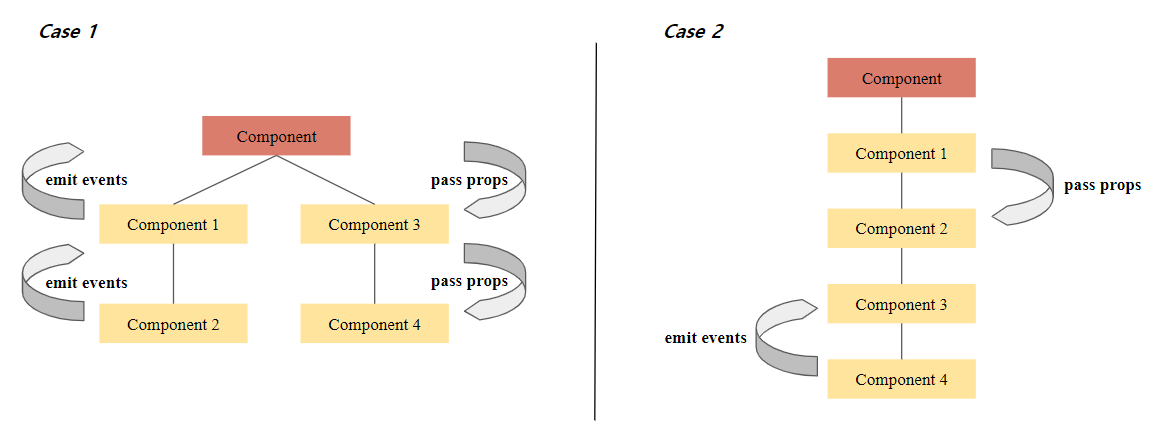
- CASE 1
- 부모 컴포넌트에 자식 컴포넌트가 여러 개 있는 경우입니다.
- Component2 와 Component4 가 서로 통신을 하기 위해서는 부모 컴포넌트까지 거슬러 올라갔다가 이후에 다시 가장 밑에 있는 자식까지 내려가야 합니다.
- CASE 2
- 고조 할아버지 컴포넌트가 있고 그 제일 밑에 손자 컴포넌트가 있는 경우입니다.
- Component 와 Component4 가 서로 통신을 하기 위해서는 차례대로 거슬러 올라가거나 거슬러 내려가야 합니다.
위 Case1 과 Case2 를 살펴보면 하나의 공통점을 발견할 수 있습니다. 두 개의 컴포넌트가 서로 간 통신을 하는데 있어, 여러 컴포넌트를 지나간다는 것을. 따라서 저는 이를 해결하기 위해서 이벤트버스 를 이용하였습니다.
-
이벤트버스

- Vue 인스턴스를 중앙 이벤트 버스로 사용합니다.
- 이벤트 버스를 사용하기 위해선 아래의 세가지 내용만 알고 있으면 됩니다.
- 이벤트버스를 생성합니다.
- 이벤트버스를 통해 이벤트를 발생시킵니다.
- 이벤트버스를 통해 이벤트를 감지합니다.
- 1~3 을 통해서 위의 그림처럼 형제 컴포넌트인 Group-Comment 와 Comment-Input 는 서로 통신할 수 있습니다.
1. 이벤트버스의 생성 샘플코드
/**
 * 비어있는 Vue 인스턴스를 통해서 이벤트버스를 초기화할 수 있습니다.
 */

import Vue from 'vue'

const EVENT_BUS = new Vue();

export default EVENT_BUS
2. 이벤트버스를 통한 이벤트 발생 샘플코드 (CommentInput.vue)
- 이벤트를 발생시키는 작업, $emit() 수행합니다.
import eventBus from '../../api/eventBus.js'

/** 생략 **/

writeCommentProcess(commentObject) {
    // [댓글] 등록 이후 형제 컴포넌트에게 이벤트 전달
    writeComment(commentObject).then(() => {
        this.commentContent = '';
        eventBus.$emit('setupWriteCommentEventBus');
        eventBus.$emit('setupTotalCountGroupNoEventBus');
    })
},

writeReplyProcess(commentObject) {
    // [답글] 등록 이후 형제 컴포넌트에게 이벤트 전달
    writeReply(commentObject).then(() => {
        this.commentContent = '';
        eventBus.$emit('closeReplyEventBus', this.replyIndex);
        eventBus.$emit('closeReplyCommentListEventBus', this.replyIndex);
    })
},
3. 이벤트버스를 통한 이벤트 감지 샘플코드 (GroupComment.vue)
- 컴포넌트 라이프 사이클에 의해서 이벤트를 감지할 수 있도록 created 훅에서 $on() 을 수행합니다.
- 외부로부터 받아온 값을 세팅하거나 이벤트 리스너 선언 시 이 단계에서 진행합니다.
- 컴포넌트 라이프 사이클에 의해서 이벤트버스 연결을 해제시킵니다. beforeDestory 훅에서 $off() 를 수행합니다.
- 해당 인스턴스가 해제되기 직전에 beforeDestroy() 훅히 호출됩니다. 이 단계에서 인스턴스가 사라지기 전에 해야할 일들을 수행합니다.
import eventBus from '../../api/eventBus.js'

/** 생략 **/

created() {

    /** 생략 **/

    // ( [댓글] 작성 시 ) 형제 컴포넌트에게 이벤트를 받아서 수행
    eventBus.$on('setupWriteCommentEventBus', this.setupWriteComment);
    eventBus.$on('setupTotalCountGroupNoEventBus', this.setTotalCountGroupNo);

    // ( [답글] 작성 시 / 답글이 더 이상 존재하지 않는 경우)
    eventBus.$on('closeReplyEventBus', this.closeReply);
    eventBus.$on('closeReplyCommentListEventBus', this.closeReplyCommentList);
},

beforeDestroy() {
    eventBus.$off('setupWriteCommentEventBus');
    eventBus.$off('setupTotalCountGroupNoEventBus');

    eventBus.$off('closeReplyEventBus');
    eventBus.$off('closeReplyCommentListEventBus');
}
뷰엑스(Vuex) 의 필요성
만약 컴포넌트의 개수가 많아지고, 서비스의 규모가 커진다면 Vuex 를 고려해보아야 합니다. 왜냐하면 화면이 복잡해지고 이벤트 버스만으로는 더이상의 데이터 관리가 어렵기 때문입니다. 따라서 서비스의 규모에 따라 적절한 판단을 가지고 EventBus 또는 Vuex 를 이용하는 것이 좋습니다.
저는 Vuex 에는 최소한의 사용자 정보만을 관리하였습니다.
뷰엑스(Vuex) 의 이용
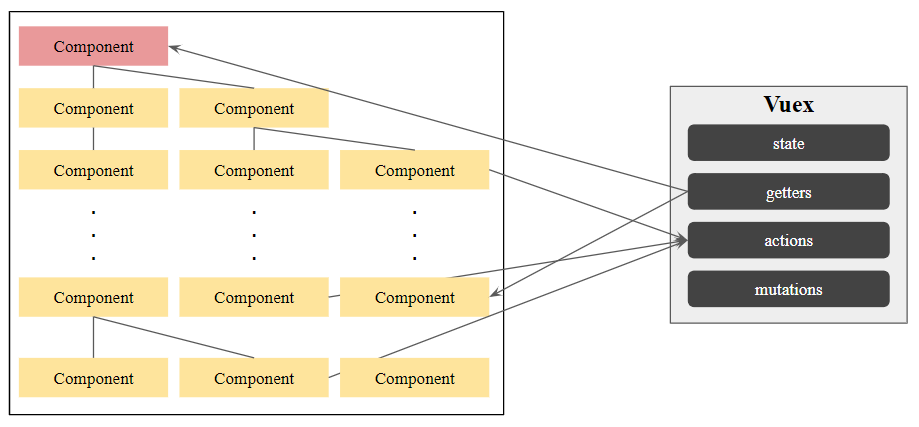
- Vuex
- state : 컴포넌트간 공유되는 데이터입니다.
- getters : 각 컴포넌트에서 Vuex 의 데이터에 접근할 때, 중복된 로직을 방지하게 해줄 수 있습니다.
- actions : 비동기 처리를 위해서 사용할 수 있습니다. 사용자 입력에 반응할 메소드들을 가지고 있습니다.
- mutations : Vuex 의 데이터, state 값을 변경하는 로직을 의미합니다.
store.js 일부 코드
import Vue from 'vue'
import Vuex from 'vuex'
import getters from './getters'
import actions from './actions'
import mutations from './mutations'

Vue.use(Vuex);

/** 공유자원 **/
const state = {
    user: [],
    isAuth: false,
    stream: {},
    targetUser: [],
    pageable: {page: 0, size: 3, total: 0},
};

export default new Vuex.Store({
    state,
    mutations,
    getters,
    actions
})
getters.js 일부 코드
/** getters.js **/
STREAM(state){
    state.stream = JSON.parse(localStorage.getItem(STREAM));
    return state.stream;
},
actions.js 일부 코드
/** actions.js **/
closeStream() {

    const API_NOTIFICATION_URL = "/api/notification";
    const STREAM = store.getters.STREAM;

    // 스트림 중단
    let url = API_NOTIFICATION_URL + "/user/push-close?uuid=" + STREAM.id;

    return new Promise(function (resolve) {
        Vue.prototype.$http.get(url)
            .then((response) => {
                resolve(response);
            })
    });
},
mutations.js 일부 코드
/** mutations.js **/
setStream(state, uuid){
    state.stream.id = uuid;
    state.stream.isStream = true;

    const serializedUserUUID = JSON.stringify(state.stream);

    localStorage.setItem(STREAM, serializedUserUUID);
},
프론트엔드 개발을 하면서 느낀 사항
- Q : 이벤트버스가 결국에는 뷰엑스 로 결국에는 바뀔 거라는 생각
- 일반적으로 프로젝트를 개발하고 기능을 구현하고 서비스 출시를 하게 된다면, 해당 서비스는 지속적인 관리를 하면서 좀 더 규모를 키우게 될 것이라는 생각이 듭니다.
- 그렇게 된다면 기존에 사용하던 이벤트버스를 걷어내고 뷰엑스로 갈아타야 되는 상황이 오게 될텐데, 그렇다면 굳이 이벤트버스를 사용할 일이 있을까? 라는 생각이 문득 들었습니다.
- A : 그럼에도 불구하고 이벤트 버스를 사용해볼 만하다
- 만약 서비스의 규모가 크지 않고, 이후에도 규모 확장에 대해서 논의되고 있지 않다면 사용할 수 있지 않을까.
- 팀 내에서 정해진 약속에 의해서 컴포넌트 간의 통신의 범위를 정한다면 사용할 수 있지 않을까.
위의 생각을 가지게 해준 링크입니다. 우아한 형제들에서 2018년 6월에 작성된 글입니다. 현재에는 종료된 서비스이지만 글을 읽어보면 이 당시 서비스에 vuex 를 적용하지 않았음을 이야기해주고 있는 듯합니다.
- 컴포넌트 설계와 데이터 재사용과의 관계
- 올바른 컴포넌트 설계가 데이터 재사용성을 극대화 시킨다고 느꼈습니다.
- 처음에 부모 컴포넌트 하위에 자식컴포넌트가 여러 있고, 그 자식컴포넌트 하위에 손자 컴포넌트가 여러개 있는 그러한 형태로 설계가 되었습니다. 이 당시에 자식 컴포넌트와 손자컴포넌트간의 이벤트가 발생되고 감지되고 데이터가 전달되는 등 수많은 일들이 일어났습니다. 그렇게 수 많은 일들속에서 코드는 점점 더러워지고 내용은 복잡해지며 데이터의 재사용성이 현저하게 떨어졌습니다. 그 때문에 프로젝트 중간에 컴포넌트들을 다 갈아엎고 다시 작성하게 되었습니다. 이 당시 엄청 아찔했습니다.
- 결과적으로 컴포넌트 간의 통신을 좀 더 유기적으로 하기위해선 컴포넌트 설계가 올바르게 되어야 한다는 생각을 했습니다. vue 에서 컴포넌트에 대한 가치를 제공할 뿐 제공하는 가치를 극대화 시키는 것은 개발자의 몫이라는 생각이 듭니다.
3.4 SpringBoot 와의 만남
- 스프링 부트는 스프링의 개발환경을 매우 빠르게 세팅할 수 있었습니다.
- 별도의 컨테이너 설치 없이 부트 내에 내장된 톰캣을 통해서 빠르게 실행시킬 수 있었습니다.
- 메이븐 혹은 그래들같은 빌드툴을 통해 프로젝트의 의존성 관리를 쉽게할 수 있었습니다.
- 라이브러리의 버전들에 대한 호환을 신경쓰지 않아도 되어 좋았습니다.
- 관련내용
(1) 백엔드 전체 구조
(2) 댓글 및 대댓글(답글) 작성
- 알림 시스템 기능 구현에는 발생 알림 클릭 시, 해당 위치로 이동해야 한다는 요구사항이 있었습니다. 그래서 댓글이나 답글이 작성된 이후에 그 작성된 내용에 대한 경로 값을 가지고 있어야 했습니다. 만일 사용자가 특정 알림을 클릭하면 해당 화면으로 넘어갈 수 있어야 하기 때문입니다.
- 경로 값을 저장하고 그 경로 값에 대해서 화면을 렌더링 해준다는 측면을 고려할 때, 뷰에서 동적 라우팅 매칭 을 사용하였습니다. 그로 인해 프로필 화면에 달릿 댓글 또는 답글에 대한 값을 가지고 렌더링을 시도할 수 있겠다 생각했습니다.
- 동적 라우팅을 위해선
:을 사용해서 값을 표시하면 사용할 수 있었습니다.
- 동적 라우팅을 위해선
동적라우팅을 위한 일부 코드
const router =  new Router({
    mode: 'history',

    base: process.env.BASE_URL,

    routes: [
        /** 생략 **/
        {
            path: '/app',
            component: AppView,
            children: [
                {
                    path: '',
                    name: 'profileList',
                    component: ProfileList
                },
                {
                    path: 'profile',
                    name: 'profile',
                    component: Profile,
                },
                {
                    path: 'profile/:profileId/groupNo/:groupNo',
                    name: 'notificationComment',
                    component: Profile,
                },
                {
                    path: 'profile/:profileId/groupNo/:groupNo/groupOrder/:groupOrder',
                    name: 'notificationGroupComment',
                    component: Profile,
                }
            ]
        },
        /** 생략 **/
});
(3) 알림(:댓글 및 답글) 이동
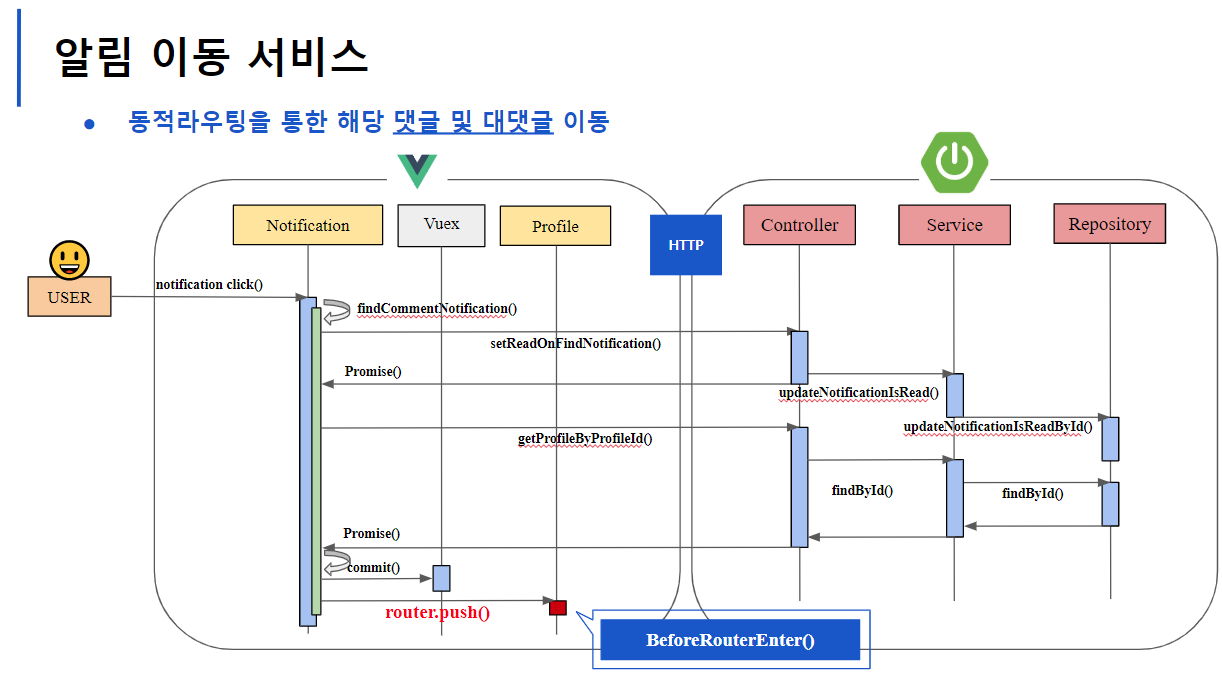
- 알림이 발생한 위치로 옮기기 이전에, 우선적으로 해당 알림에 대해서 읽었음을 ‘Y’ 로 표시해주었습니다.
- 라우터 인스턴스의
router.push()를 통해 알림 발생한 URL 로 이동하였습니다. - 이 때
BeforeRouterEnter()가 작동됩니다.BeforeRouterEnter()는 뷰 라우터에서 제공하는 네비게이션 가드 중에 하나입니다.- BeforeRouterEnter 는 컴포넌트를 렌더링하는 라우터 앞에서 호출됩니다.
- 해당 가드가 호출될때는 라이프사이클을 타기 이전이라
this로 접근할 수 없습니다. this로 접근하지 못하기 때문에 콜백을 next() 에 전달하여 컴포넌트에 접근할 수 있습니다.vm을 통해서 컴포넌트 인스턴스에 접근합니다.
BeforeRouterEnter 일부 코드
beforeRouteEnter(to, from, next) {

    /**
     * - to : 이동할 URL 정보가 담긴 라우터 객체
     * - from : 현재 URL 정보가 담긴 라우터 객체
     * - next : 훅을 해결하기 위해서 호출 (to 에서 지정한 url 로 이동하기 위해 반드시 호출)
     */

    let fromPath = from.path;
    let toPath = to.path;

    /** 알람을 통한 이동 **/
    next(vm => {

        /** vm을 통해 컴포넌트 인스턴스 접근 **/

        if (vm.$route.params.profileId === undefined) {
            return;
        }

        let profileId = vm.$route.params.profileId;
        let groupNo = vm.$route.params.groupNo;
        let groupOrder = vm.$route.params.groupOrder;

        if (groupOrder === undefined) {
            /** [댓글]에 알람 컴포넌트 세팅 **/
            vm.notificationCommentSetup(profileId, groupNo);
        } else {
            /** [답글]에 알람 컴포넌트 세팅 **/
            vm.notificationGroupCommentSetup(profileId, groupNo, groupOrder);
        }
    })
}
알림 댓글에 컴포넌트 세팅 코드
notificationCommentSetup(profileId, groupNo) {

    console.log("====> [댓글] 알림을 확인합니다.");

    /** 알람이 일어난 프로필 획득 **/
    getProfileByProfileId(profileId).then((response) => {

        let targetUser = response.data;

        this.user = targetUser;
        this.profile = targetUser.profile;
        this.$store.commit('setTargetUser', targetUser);
    });

    /** 알람이 일어난 댓글 획득 **/
    findNotiCommentByProfileId(profileId, groupNo).then((response) => {
        this.alarmComments = response.data;
    });
},
알림 답글에 컴포넌트 세팅 코드
notificationGroupCommentSetup(profileId, groupNo, groupOrder) {

    console.log("====> [대댓글] 알림을 확인합니다.");

    /** 알람이 일어난 프로필 획득 **/
    getProfileByProfileId(profileId).then((response) => {

        let targetUser = response.data;

        this.user = targetUser;
        this.profile = targetUser.profile;
        this.$store.commit('setTargetUser', targetUser);
    });

    /** 알람이 일어난 댓글 및 답글 획득 **/
    findAlarmGroupCommentByProfileId(profileId, groupNo, groupOrder).then((response) => {
        this.alarmComments = response.data;
        this.alarmGroupComment[0] = this.alarmComments[1];
        this.alarmComments.splice(1, 1);
    });
},
(4)알림 발생
- 실시간 웹서비스 구현에 있어서 인터넷에는 여러 내용이 있었습니다.
- Polling
- 주기적인 시간을 가지고 클라이언트에서 서버로 요청하여 데이터 상태를 확인하는 방식입니다. 요청은 주기적으로 이루어지기 때문에 서버쪽의 데이터의 상태가 자주 변경되지 않는다면 불필요한 요청 및 응답이 발생합니다.
- Long Polling
- 클라이언트가 서버로 요청을 하여 일정한 시간동안 연결을 열어두고 있습니다. 이후 일정한 시간이 끝나면 클라이언트는 다시금 서버로 요청을 합니다. 요청 및 응답 트랜잭션을 완료하고 새롭게 요청하는 방식으로 구현됩니다.
- Streaming
- 클라이언트가 한 번 요청 이후에 서버는 응답을 완료하지 않고 스트림을 통해 이벤트가 발생하는 경우마다 필요 시 데이터를 전송하는 방식입니다. 무한하게 혹은 지정한 시간만큼만 연결을 열어두고 유지한 상태로 데이터를 수신할 수 있습니다.
- WebSocket
- 클라이언트와 서버가 양방향 통신을 할 수 있도록 지원하는 프로토콜입니다.
저는 HTTP 통신 기반의 Server-Sent-Events 를 사용하였습니다.
- Polling
- Server-Sent-Events (이하 Sse)
- 클라이언트에서 폴링을 사용하지 않고 HTTP 커넥션을 통해 서버에서 이벤트 발생 시 클라이언트로 데이터를 푸시하는 기술입니다.
- Streaming 방식으로 WebSocket 양방향 통신인것에 반해 Sse 는 단방향 통신입니다.
- HTML5 에 EventSource API 를 이용하여 Sse 를 동작시킬 수 있습니다.
- 현재(2019/06) EventSource 는 모든 브라우저와 호환되고 있지 않습니다. (관련링크)
Sse 를 이용 브라우저 화면

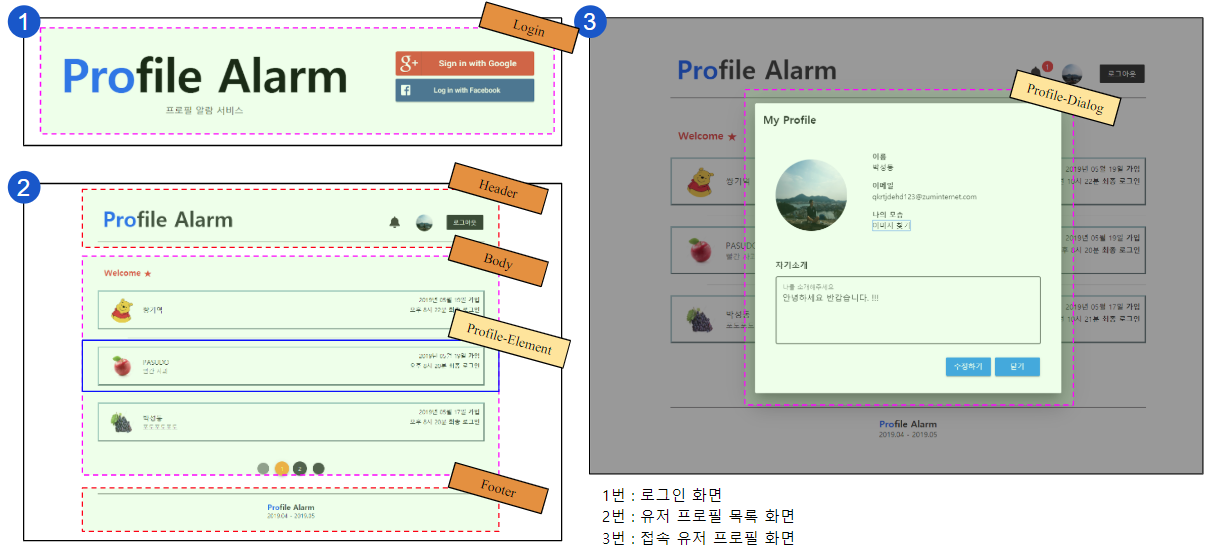
- 서비스에 유저가 접속하고 있는 상태에서 누군가 자신의 프로필에 댓글을 작성한 경우의 우측 화면 상단에 표시가 나타납니다.
알림 서비스 다이어그램
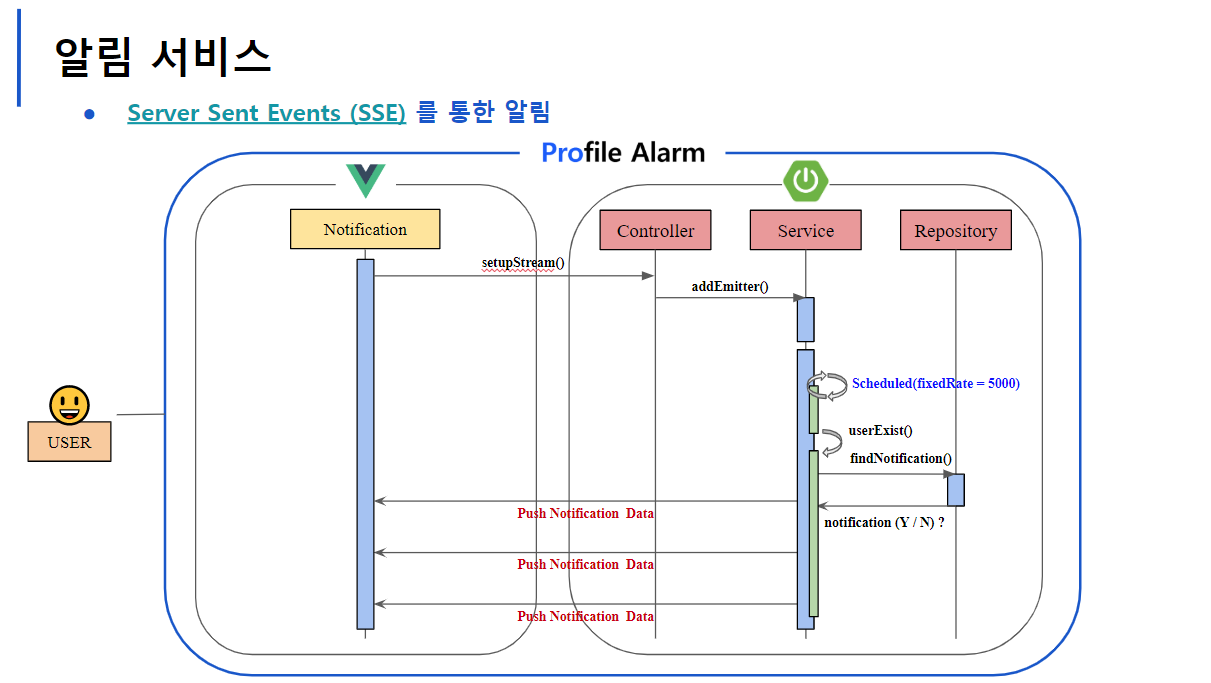
- 가장 처음에
setupStream()을 통해서 서버와 커넥션을 맺습니다. - 서버에서는 서비스에 접속한 유저 존재여부를 파악하는 스케쥴링을 실시합니다.
- 접속한 존재가 존재하는 경우 (두가지를 확인합니다.)
- 생성된 지 30분 이내의 알림 여부
- 아직 알림을 푸시하였는지 여부
- 위 두 조건을 만족하는 알림에 대해서 접속 유저에게 데이터를 전송합니다.
EventSource 생성 및 스트림 연결 샘플 코드
let url = API_NOTIFICATION_URL + "/user/push?uuid=" + STREAM.id;

let eventSource = new EventSource(url, {withCredentials: true});
- 클라이언트에서
new EvnetSource()를 통해 특정 url 과 연결합니다. - eventSource 객체가 생성되는 순간 이벤트 스트림이 열리게 됩니다.
- 서버에서는 이벤트를 전송할 때 text/event-stream 포맷에 맞추어서 전송해주어야 합니다.
withCredentials: true옵션을 통해 타 도메인에 대한 쿠키값을 전송할 수 있도록 설정하였습니다.
알림 컨트롤러 샘플 코드(Controller)
@Slf4j
@RestController
@RequestMapping("/api/notification")
public class NotificationController {

    private final NotificationService notificationService;

    public NotificationController(NotificationService notificationService) {
        this.notificationService = notificationService;
    }

    /** 생략 **/

    @GetMapping(value = "user/push", produces = MediaType.TEXT_EVENT_STREAM_VALUE)
    public ResponseEntity<SseEmitter> fetchNotify(@AuthenticationPrincipal CustomOAuth2User oAuth2User,
    											  @RequestParam(required = false) String uuid) {

        if (oAuth2User == null || uuid == null) {
            throw new UnauthorizedException("식별되지 않은 유저의 요청입니다.");
        }

        final SseEmitter emitter = new SseEmitter();
        final User user = oAuth2User.getUser();
        final StreamDataSet DATA_SET = new StreamDataSet(user, emitter);
        final String UNIQUE_UUID = uuid;

        try {
            notificationService.addEmitter(UNIQUE_UUID, DATA_SET);
        } catch (Exception e) {
            throw new InternalServerException(e.getMessage());
        }

        emitter.onCompletion(() -> {
            notificationService.removeEmitter(UNIQUE_UUID);
        });
        emitter.onTimeout(() -> {
            emitter.complete();
            notificationService.removeEmitter(UNIQUE_UUID);
        });

        return new ResponseEntity<>(emitter, HttpStatus.OK);
    }

}
- 서비스를 접속한 유저에 한해서 푸시를 받을 수 있습니다. 그에 따라 SseEmitter 객체를 생성합니다.
- SseEmitter 는 스프링에서 Server-Sent-Events 를 구현하기 위한 타입입니다. (ResponseBodyEmitter 를 상속받습니다.)
- ResponseBodyEmitter 비동기 요청이 들어오고 하나 이상의 오브젝트 타입을 반환하는 리턴 타입입니다.
- 동일한 유저 상 서로 다른 클라이언트 접속은 UUID 로 구분하였습니다.
- 비동기 요청이 실시되고 이벤트가 발생하면 클라이언트로 데이터를 보낼 수 있도록 응답은 열려있는 상태입니다.
- 응답 포맷은 text/event-stream 에 맞추어져 있습니다.
알림 서비스 레이어 샘플 코드 1 (Service)
@Slf4j
@Service
@EnableScheduling
public class NotificationService {

    /** 생략 **/

    private final ConcurrentHashMap<String, StreamDataSet> eventMap = new ConcurrentHashMap<>();

    void addEmitter(final String UNIQUE_UUID, final StreamDataSet dataSet) {
        eventMap.put(UNIQUE_UUID, dataSet);
    }

    void removeEmitter(final String UNIQUE_UUID) {
        eventMap.remove(UNIQUE_UUID);
    }

    @Scheduled(initialDelay = 2000L, fixedDelay = 5000L)
    public void fetch() {

        if (eventMap.size() == 0) {
            return;
        }

        this.handleAlert();
    }

}
- 스케쥴링을 통해서 서비스에 접속한 유저 존재 여부를 판단한다.
알림 서비스 레이어 샘플 코드 2 (Service)
@Slf4j
@Service
@EnableScheduling
public class NotificationService {

    /** 생략 **/

    @Transactional
    public void handleAlert() {

        List<String> toBeRemoved = new ArrayList<>(eventMap.size());
        List<Long> alertIdList = new ArrayList<>();

        for (Map.Entry<String, StreamDataSet> entry : eventMap.entrySet()) {

            final String uniqueKey = entry.getKey();
            final StreamDataSet dataSet = entry.getValue();

            final User user = dataSet.getUser();
            final List<Notification> receivingAlert = notificationRepository.findByNotificationTargetUserUidAndIsReadIsFalse(user.getUid());
            final int noneReadCount = receivingAlert.size();

            /** 접속 유저가 읽지 않은 알람의 개수 **/
            if (noneReadCount == 0) {
                continue;
            }

            final SseEmitter emitter = dataSet.getSseEmitter();

            /** 30분 이내에 작성된 알람 목록 확인 **/
            final List<Notification> alertList = getListAnMinuteAndAlertFalse(receivingAlert);

            if (alertList.size() == 0) {
                continue;
            }

            /** 알림데이터 생성 **/
            NotificationAlert alert = NotificationAlert.builder()
                    .uid(user.getUid())
                    .notificationCount(noneReadCount)
                    .notifications(alertList)
                    .build();


            /** 알림 목록 ID 획득 **/
            alertIdList.addAll(alertList.stream()
                                    .map(Notification::getId)
                                    .collect(Collectors.toList()));

            try {

                /** 알림 전송 수행 **/
                emitter.send(alert, MediaType.APPLICATION_JSON_UTF8);

            } catch (Exception e) {
                log.error("이미터 센드 시 에러 발생 :: {}", e.getMessage());
                toBeRemoved.add(uniqueKey);
            }

        } // for

        /** 전송된 알람들 IS_ALERT 'Y' 로 변경 **/
        updateIsAlert(alertIdList);

        /** 전송 오류 SseEmitter 제거 **/
        for (String uuid : toBeRemoved) {
            eventMap.remove(uuid);
        }
    }

}
- 접속한 유저의 uid 값을 이용합니다. (uid 값은 유니크합니다.) 현재 유저의 읽지 않은 알림의 개수를 파악합니다.
- 읽지 않은 알림의 개수 판단 여부
- 알림이 30분 이내에 작성된 것
- 아직 사용자에게 전송하지 않은 것
- 1과 2가 충족되었다면
SseEmitter.send()를 수행합니다.
SseEmitter.send()수행 이후에 전송된 알림에 대해서isAlert을 ‘Y’ 로 변경합니다.
/**
 * - 30분 이전에 발생된 알람 여부
 * - 알람 푸시 수행 여부
 *
 * @param paramList 현재 접속 사용자에게 존재하는 전체 알림
 * @return 현재 시간으로부터 30분 이전에 발생한 알림 목록
 */
private ArrayList<Notification> getListAnMinuteAndAlertFalse(List<Notification> paramList) {

    ArrayList<Notification> alertList = new ArrayList<>();

    LocalDateTime beforeTime = LocalDateTime.now().minusMinutes(30);

    for (Notification notification : paramList) {

        boolean isAlert = notification.isAlert();
        LocalDateTime createdAt = notification.getCreatedAt();

        if (createdAt.isBefore(beforeTime) || isAlert) {
            continue;
        }

        // 30 분 이내 알리미 & 안 읽은 알리미
        alertList.add(notification);
    }

    return alertList;
}
/**
 * - 전송된 알림에 대해서 IS_READ 값을 'Y' 로 변경
 *
 * @param alertIds 전송된 알림 ID 목록
 */
private void updateIsAlert(List<Long> alertIds) {

    Set<Long> idSet = new HashSet<>(alertIds);
    idSet.stream().forEach(notificationRepository::updateNotificationIsAlertById);

}
예외처리 샘플 코드
- 식별되지 않은 사용자에게 요청이 들어온 경우
- 유저에게 데이터 전달 시 에러가 발생한 경우
@ResponseStatus(value = HttpStatus.UNAUTHORIZED, reason = "request does not contain authentication credentials")
public class UnauthorizedException extends RuntimeException {

    public UnauthorizedException(String message){
        super(message);
    }

}
@ResponseStatus(value = HttpStatus.INTERNAL_SERVER_ERROR, reason = "Internal Server Error")
public class InternalServerException extends RuntimeException {

    public InternalServerException(String message){
        super(message);
    }

}
알림 삭제 샘플 코드
/**
 * reference :: https://crontab.guru/#0_2_*_*_*
 * 일 단위 At 02 : 00 에 알림 데이터는 삭제된다.
 *
 */
@Scheduled(cron = "0 0 2 * * *")
public void deleteNotificationByCron() {

    notificationRepository.deleteNotificationByCron();

}
- 관련내용
4. 파일럿 프로젝트를 마무리하며
처음 파일럿 프로젝트 주제와 기술스택 및 기능스펙을 들었을 때 이게 4주동안 가능한 일인건가 생각이 들었습니다. 하루하루 굼뜬 굼벵이마냥 진행되는 개발속도와 서비스 구현력에 있어서 저의 마음은 개발에 대한 성취감과 스스로에 대한 부끄러움을 넘나들었습니다.
이후 발표와 코드리뷰를 거치면서는 나는 정말 많은 부분을 고려하지 않고 코딩을 하고 있었구나 하는 생각을 하였고, 추가적으로 이건 왜 썼냐는 질문에 제대로 된 답변을 하지 못했습니다. 그제서야 다시 찾아보고 공부하고 확인했습니다. 개인적으로 저는 이 파일럿 프로젝트가 전반적인 웹개발의 경험 및 지식습득과 더불어 앞으로 개발자가 되기 위해서 갖추어야 할 자세들을 상기시켜 주었습니다.
이제 실무를 접하게 될텐데, 파일럿 경험을 바탕으로 개발자가 가져야할 자세를 머릿 속에 새기면서 프로그래밍에 임한다면 어제의 나보다 좀 더 나아지지 않을까 기대합니다.
감사합니다.

Comments